Sunday, December 23, 2018

Speak Softly

Bodi is allowed in my personal space when he is calm enough to be polite.
A horse hanging out in their own horsey herd seems to communicate effortlessly with the other horses with almost no visible signs that they're speaking at all. An ear twitch or sassy look might be all the communication necessary.

When I try to communicate with horses I have a hard time controlling my "volume," or how intense I make my gestures. A hand raised in front of me just a bit too quickly sends the horse's head away from me, eyes wide. Not standing straight enough means a horse moves closer than I'd like it to and I have to move or move them, when I meant to stop them just outside of my personal bubble.

To make things even more interesting, a different level is needed with every horse. What works with one may be too intense or not intense enough to get the same reaction from another.

Aspen hanging out in his new field with a more dominant horse,
but one who responds more intensely to body language than Aspen.

Polite, or more finely nuanced body language on the ground with horses is a skill that I'm still learning to apply. Below is one example of a nuanced interaction.


I greet Aspen. (Photo courtesy of Amy M.)

In this first photo I wanted to come over and say hello to Aspen without making him leave. Things I noticed in this photo are details like my body posture- leaning forward and slumping a bit, with an arm extended slightly. My hand is offered with the knuckles facing Aspen's nose and the hand in a low, relaxed position. On Aspen's part, his eyes are half-closed, and he has curved his neck around to sniff my hand. Importantly, he brought his face to meet me halfway. I haven't taken up all the space between us with my reach. His ears aren't pricked forward, so he's not super interested in me, but they are flopped slightly to the sides, which means he's relaxed.

The most important part here in getting him to stay is to keep my hand still and not move it to pet his face. SO MANY of my early interactions with horses were me trying to pet their faces. Horses would invariably move their heads away from my hands, sometimes followed by leaving entirely if they were shy or uninterested. I found that waiting in this greeting position for the short span of time it took to complete the greeting process on the horse's terms allowed me to go ahead and pet their shoulder or halter them or pick their feet, etc with less aversion on the horse's part. It made such a difference, just waiting for the horse to finish greeting me and turn their head away (or start shaking me down for treats) on their own.

Aspen follows me to see what I'm up to. (Photo by Amy M.)

In the second photo I've turned to walk toward the fence and Aspen has decided to follow me to see where I'm going. It helped that Amy was there taking the picture and Aspen was half-thinking he might walk over there himself. (He was looking at Amy with ears forward.)

This time my posture is more bold- my shoulders are relaxed but square. My frame is bigger. I have a purpose for walking over there. However, my head is still lowered. I'd backed away from Aspen while motioning with my hand like I had a lead rope in it and was leading him toward the fence. In the picture Aspen mirrors my posture with relaxed ears and low head. He seems curious.

Not every interaction ends the way I want it to. It helps if the horse has an inclination to do the thing, or close to the thing, I wanted to do too. Bodi, for example, has periods where he's full of energy, and it's easier to teach him to canter on cue when he's already half-willing to move fast anyway.


Bodi learning about Sophia's personal bubble.Her ears say "back off or I'll bite you."
In conclusion, much of the process of learning how to communicate with horses involves toning down the movements I would normally use to communicate with humans, or finding gradients in between levels I would think of as low, medium, and high. Literally the same movement performed a few seconds later or an inch lower gives me the reaction I want vs the horse moving away or crowding my space. It's difficult, but rewarding when I can ask a horse to stand in one spot off-lead, just through my body posture. I look forward to learning even more nuance as I go.

Monday, November 26, 2018

Fall Greens

With all the news recently about yet another outbreak of leafy greens food poisoning, I figured maybe other people would like to learn how to grow leafy greens nearly year round for themselves. Either in the ground or in a pot on your porch, greens grown in your own dirt have only the fertilizers and pesticides that you decide to use on them. I'll go into some of the fertilizers and pest control methods I use on mine, since there are plenty of critters which like lettuce just as much (if not more) than I do.
Kale, living the dream even in snow

Greens are very versatile. Most are cool weather crops, meaning that although it's possible to grow them in the heat of August, they may not taste as good when exposed to hot weather. Lettuces and other greens tend to get bitter in hot weather. It's much easier to switch over to veggies like cucumbers, peppers, and tomatoes when the going gets hot. These plants thrive in warm weather.

The months between September and January, and then between March and July are the best to grow leafy greens for your salads here in Zone 6-7 (Maryland-ish). If you grow your lettuces in pots under a grow light indoors, though, nothing is stopping you from eating lettuce in February!

To grow nice healthy greens, start them in small containers (like paper cups with holes punched in the bottom) with fresh from the bag potting soil and a soil temperature at around 70F. This prevents the tender young seedlings from getting fungus or mold infections from the soil that may cause "die off" where they just wither up. If you have problems getting your soil that warm try putting the cups in a sunny window sill or getting a seedling heating mat for your indoor grow light setup.

Lettuces ready for transplant into a permanent home

After the plants have 4-6 leaves go ahead and transplant them into wherever they will be living while you harvest them. When you harvest, harvest the oldest, outer leaves first and don't take more than half of the leaves off of a single plant at a time. You may want to start a second batch of leafy greens a few weeks after planting the first to get a nice staggered harvest of plants.

Some lettuces and other leafy greens are bred to do well in hot weather. Look for "slow to bolt" varieties such as Buttercrunch Lettuce.

Some greens are bred to do better in cold weather, or are naturally more frost-tolerant. Kales are very cold hardy, with some varieties able to withstand below-freezing temperatures for multiple days. My Blue Curly Kale was fine in a pot on my porch down to about 20F! Red Russian Kale that I have growing in my garden seems to struggle with more than a day of freezing weather though. Spinach and lettuce do well at temperatures hovering around freezing, but many don't survive a frost. Weirdly this year the Buttercrunch lettuce is doing fine with a frost or two. Buttercrunch has got to be one of my favorite salad greens of all time.

You'd also be surprised what other veggies have edible greens. Turnips produce a big turnip root but also edible leaves which taste best when par boiled and then added to soups. They can also be sauteed in oil and herbs. Beets also have edible greens, though I don't like the taste of those personally.

mmm....Turnips

There ARE some pests that love leafy greens, especially cabbages and kales. Cabbage loopers and other caterpillars are my number one pest on greens. I personally pick them off and squish them until they get too bad, then I use a bacteria called Bt which is sold as a stinky green concentrate at the garden center. It's organic, since it is a naturally-occuring bacteria that only affects caterpillars and has a lifespan of about 24 hours after being applied. It decays in sunlight, so I try to spray on overcast days when it's not expected to rain for at least a few hours. I've also tried neem oil as an organic spray, but that works better on mites and aphids than on caterpillars.

Cabbage Looper

Rabbits and deer are a pest in our neighborhood, so I will spray the garden with deer and rabbit repellent every few weeks. I also put netting over the tender greens so they don't get nibbled on. It seems to help, as it's less effort to go eat the plants without netting. :P You can also put up a fence if they get too bad.

For slugs I will occasionally put a dusting of diatomaceous earth around the lettuces, but I don't do this often, as the sharp points of the diatomaceous earth cut up everything indiscriminately. I don't want to deter bugs like earthworms or bumblebees in my garden because they brushed up against something intended for slugs. Luckly as soon as it rains it dissolves the sharp points of the diatoms and renders it useless.

Fertilizing my garden currently consists of turning compost into the soil with a pitchfork every time I pull things out and re-plant a vegetable bed. It seems to be working so far, though I have had to add extra calcium in the way of crushed up Tums for my tomato plants. Greens seem to do well in less fertile soil.


I hope this helps in your quest to not get e.coli poisoning from your next salad! Growing your own salad greens is rewarding and salads just taste better when you are proud of growing them yourself.


Sunday, October 14, 2018

Lessons from the Wild

It's been a few months since the last time I posted something. I didn't realize how difficult it is to use Blogger on my phone until I tried it and couldn't insert any pictures. Bleh. Anyway, today's topic is what I learned from plants growing in the wild that can be adapted to my garden.

Wild Bee Balm,
which also grows in a pink form in my garden

There were a few vacations and nature walks I took this summer. One was in Dolly Sodds, WV. The environment on top of the mountains here is totally different than only a few hundred feet below. It's supposedly the same environment that is found in the Canadian tundra, but was left behind as a habitat when the glaciers receded.

The thing I learned here was how to use shrubs to create an isolated clearing feeling, even feet away from the road. The towering rhododendrons and soft mosses growing on the rocks created a cozy glen where the cars on the road could still be heard, but not seen. It was like a little room, complete with moss carpet.

Strange ferns in Dolly Sodds, WV

My hike in Caroline Furnace, VA was through a new-growth forest. The land owners had heaped up the dirt from a road-side drainage ditch to create a raised path through the woods. There was a lot of moss on the areas of the path that received dappled sunlight, coupled with a lack of thick leaves because of the rain and wind sweeping them off of the raised surface. I learned that moss doesn't grow where thick leaves are.

Moss may not grow on a rolling stone,
but it sure grows well on a partly sunny one!

It's not a plant fact, but I also learned here that the long tensile strands holding a spider web to anchor points are not sticky, whereas the web strands going around and around are. You can literally lift a spider web out of your path with a finger on the anchor strands, then let it plunk back into place after you. The spider still runs to the top of the web or drops to the ground though. I'm not sure if it was worth it other than I didn't end up with an orb spider on me every ten feet. I'm amazed at how strong spider webs are.

I love orb spiders, just not on my face

In Elk Springs, WV I went for a hike at the top of a mountain that had not been disturbed for a pretty decent amount of time. Not old-growth, but older than a few decades. I learned that some plants like Joe Pye Weed likes growing beside streams because it has more sunlight there. The closer a plant can get to actually sitting IN the stream, the more light it can claim, since other plants aren't competing with it. Maybe that's why it's so hard to find shade plants for permanently wet locations.

Joe Pye Weed growing practically in the stream

My yard has given me a lot of information about what happens when too. I've learned what pests show up when, when the soil gets really soggy vs when it dries out, and how the sun moves from season to season. I had a little bit of this information when I lived in the apartment, but I only had my little porch to go off of. Now I have an entire yard to get information from.

I like learning about plants by just observing other plants. Nature does a good job of telling me where a plant will grow well, because there's no person messing with the soil and water it gets when it's in the wild. If it doesn't do well it just dies. Hopefully I can go for more hikes next year to see what new things I can learn!


Sunday, June 24, 2018

Staking and Trellising


Wooden tomato stakes
The garden is on the summer upswing, with lots of rain to fuel its growth. Plants start getting to the point where they need some direction in order to avoid becoming a sprawly mess by mid-July. That's where plant stakes and trellises come in.

Trellising can include everything from ornate wrought iron stands to a simple wooden stick in the ground. Anything you can use to provide support to a growing plant. I was lucky enough to have the former owners of this house leave a lot of their staking and trellising supports in the shed when they moved. There are some nice wire hoops as well as various sticks for attaching plants to.

When choosing a trellis, choose something that will support the full mature plant's weight. This might include large fruits like melons or tomatoes, so remember the weight of those as well! My cucumber vines in the front yard are slowly collapsing my wire trellis out there... too many cucumbers. (A common problem of mine). Wooden stakes are good but need to be driven into the ground far enough that they will hold up if you put some weight on them.
The wire grid in the middle is the cucumber trellis.
The vines will need to be tied to it to train it up the trellis.
The other consideration is the final height or breadth of the plant. If you have a large sprawly vine that you're trying to grow upwards (like indeterminate tomatoes or a bean vine) you will need to provide room height or length wise for it to sprawl. My indeterminate cherry tomato plants are on 6 ft stakes which are probably too short for what the plant will get to- I'd like to eventually get 8 ft stakes. Eh, you work with what you've got.

The blackberries are young still, so I've rigged up a small arbor for them to branch out on this summer. Next year I'll work on a more permanent arbor with larger posts that can support wires which will hold up better.
Temporary blackberry trellis
Tie the plants to the support as they grow, but tie them loosely or with stretchy bands to avoid cutting the stems as they get bigger. I found these ties at the garden center and they're nice and wide and stretchy. If you don't have those I've also been using rubber bands.

Tomato tied to the supporting stake

Trellising keeps plants up off of the ground so they are less prone to things like rot and fungi. Fruit that sits on the ground can also get discolored and rot earlier, so a vine that has fruit hanging in the air will produce better quality produce for you to enjoy!

Saturday, May 19, 2018

You've Gotta be Cruel to be Kind

Now that I've gotten that song stuck in your head... It's true for plants! Dividing and cutting up plants is a great way to get them back to peak health, even if it looks a bit draconian.


Plants are naturals at growing back after damage. After all, they are at the bottom of the food chain. Plants have adapted to being eaten repeatedly, and many actually thrive when pruned, divided, trimmed, and otherwise gently mutilated. I recently got the chance to do so with two plants- one I've had for awhile that needed a boost and one that I just got from the plant store for 50% off with a sign that said "with a little TLC I can be back to full health!" For plants TLC starts with some mutilating. 

First off, Beard the Fern:
Beard, in all his shaggy glory.
Beard is a purchase I made about two years ago as a fluffy little thing at Benkhe's Garden Center. It's been living in the same pot since I got it, and although it has obviously been thriving, I've noticed the leaves are a bit paler than they used to be and the roots are coming out the drainage hole in the pot, so I decided to divide and repot it.

The first step is getting it out of the pot. I slid a knife around the inside edge to loosen the fern and then wiggled my fingers in between the side of the pot and the root ball. I also pushed from the drainage hole and the whole thing eventually popped out. The roots are getting pretty crowded in there.


The great thing about ferns like this one is that if you look at how they grow there are a bunch of little fronds all sticking up from the surface of the soil, all over. If you divide the plant and make sure you have some root and some frond attached then it will grow into a completely new plant without harming the old one. Slice into the root mass with a sharp knife, then gently pry and shake the fronds apart so they don't break off.

This is what I was left with after dividing the plant. About a third of the root mass is gone.

This is the bit I took off. You can see the fronds have their own roots/

After dividing, repot both the old plant and the new one in fresh dirt. Water in thoroughly. I also gave Beard a bit of a haircut so I could see the pot again. I like the contrast between the pot and the leaves. Now we have Beard, Goatee, and a little piece that broke off that I named Peach Fuzz.

Beard, Goatee, and Peach Fuzz

Beard barely looks like I touched him. What a fluffy plant!
Beard, post divide and trim.

The next project is an orchid. I've never had an orchid other than one that I managed to kill in less than two weeks because I watered it like a houseplant. Orchids take different care than plants that sit in dirt. I previously didn't know this, but you actually treat them more like air plants. They like moisture all at once, and then to dry out almost immediately. Humidity is good, but having the roots in water is very bad. Hopefully this time I know enough to keep it alive.

I got this orchid on sale at Patuxent Nurseries. One of the employees told me to re-pot it as soon as I got it home in the same pot but with bark instead of the peat moss that they pack in there initially. 


Here is the orchid popped out of its pot. The roots are packed into peat moss and the whole thing was rock solid. I needed to loosen it up, so I dunked it in a mug of distilled water for a few minutes. 


You can see that the roots at the bottom are kind of grey-brown and shrivelly looking. Those are rotted from sitting in water soaked up by the peat moss. These (according to some orchid growers on youtube) are ok to trim back to the green, living part of the roots. I also pulled out all of the old peat moss from around the roots.

Looky there! A new, healthy root. Maybe it will live after all.

Here it is with the peat moss gone and rotted roots trimmed off.
There were still a fair number of green roots left, so I am hopeful that this means it's healthy enough to recover fully. I put it back in its pot and shoved some bark in around it just to hold it steady in there. I think that's the only real reason to even have potting medium at all with these.


The recommended orchid bark.
All potted up with bark

I set it in bright indirect light next to one of my air plants so I remember to mist it in the mornings. The lady at Patuxent Nurseries said they can go a week or two without a real watering, so I think I'll just try once or twice a week for now and see how it does. When I do water it I'll dunk it in a mug of distilled water for a few minutes and then take it out and make sure there's no water puddling around the bottom of the container. Hope it does well!


I hope this is encouraging. I started off dividing plants in Science Club in high school when we were tasked with rejuvenating the greenhouse which had been infested with aphids and looked a little neglected. Getting to experiment with the plants and watching them come back to life after cutting them in half really helped boost my confidence with dividing my own plants later on. Just remember that plants which divide well usually have multiple stems coming up from the dirt in a spread-out, not singular fashion. These will provide roots to go along with the leaves and make for a healthy new plant. For trimming plants, trimming dead parts will only help the plant's health in the long term. You can also trim live parts as long as you don't trim more than 1/3 off at a time. (Experimenting shows that some plants can be cut to the ground and come back, but do your research). Anyway, happy mutilating!


Sunday, April 22, 2018

Happy Earth Day!

Ok, so it's been a little while since the last time I blogged. We bought a house, moved into said house, and I had to go deliver a spacecraft in California. I am slowly getting back to normal instead of a constant flailing state of exhaustion.

I did want to do an Earth Day post! Around Earth Day usually I get a few seedlings started for the year ahead. This year I have a REAL YARD so I'm preparing batches of vegetables and herbs to go in the garden in May! Cucumbers, Tomatoes, Cherry tomatoes, Swiss Chard, Lettuce, Bok Choi, Borage, Dill, and Sunflowers. Plus some flowers such as Marigolds, Zinnias, and Bee Balm. The beans (Fava, Edamame, and Green Beans) will go directly into the ground later in mid-May.

Veggie seeds ready to grow

Growing from seed is cheaper than buying starter plants, and I do enjoy the entire process. It's amazing to watch a gigantic cucumber vine grow from a single tiny seed.

I like planting seedlings in paper cups as opposed to those plastic seedling starter trays. There"s more space so I can leave them in there longer and the cups are biodegradable which makes me feel better about the whole "dont reuse seedling cartons" thing. I do have to stab some holes in the bottom for drainage though.

Stabbity

After creating drainage holes I pack the cups full of potting soil. This should be fresh from the bag potting soil, because seedlings are susceptible to something called "damping off" which is caused by bacteria and fungi (which naturally occur in soil) eating through the tender young plant stem. Potting soils, at least the higher quality ones (aka: not $5 for a giant bag), are baked out at a high temperature to kill off anything that might harm a tender young seedling. "Seedling soils" are specifically made for seed starting, but I've used regular potting soil and it works just fine. I lose maybe one seedling out of twenty to damping off.

Pack the soil down firmly but not so tightly that it's mashed in there. You want SOME air pockets.

I water the soil in the seedling pots BEFORE putting the seeds in because the water tends to create a giant crater in the soil at first, since the soil is so dry. Water, let the water soak in, then even out the surface to plant your seeds.

Follow the directions on the back of the seed packet for how deep to plant. It doesn't have to be exact- anything that says 1/8" deep I usually just sprinkle on the surface and press down on them to get good soil contact. 

Germination of seeds takes warm soil and sunlight. It's been so cold this past week that we haven't had much germination. However, some seeds naturally germinate faster than others. If you want results quick try lettuce, sunflowers, or marigolds. These are always the first to sprout for me, sometimes taking only a day or two! Different individual seeds can sprout at different rates too, so putting a few seeds in each cup and getting rid of the stragglers as they come up is a good way to make sure you have one strong plant in each cup.

Plant out in the garden when the seedlings have at least two sets of "adult" leaves (the first set of leaves looks different than the subsequent ones and act as a food source while the roots are forming).

Celebrate Earth Day by growing your own food! Or maybe just some flowers for you and the bees to enjoy. :)


PS: Some flowers from my yard that have appeared these past few weeks:


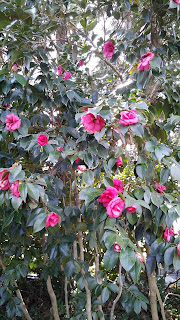
Camelias in bloom!

I have a few pretty bleeding heart plants too!


Saturday, February 24, 2018

Fun Horse/Flower Mashup

I think I'm going a little spring-crazy. I found crocus flowers in the park, the barnyard is a muck pit from the rain, and I'm walking a lot of the horses around the ring getting them out of the mud and, in some cases, started back up for spring lessons.

I thought it might be fun to match the horses at the barn up with the flowers I think they would go well with. ^_^ So here goes!

Starting with the mare field...

Cyd: Morning Glory


Morning glories open only in the morning and evening or on cloudy days. When they do open they are gorgeous pink, purple, or blue flowers. The vine is sometimes hard to control in the garden because it spreads via underground runners.


Mia: Queen Anne's Lace


Related to carrots, Queen Anne's Lace brightens the countryside in fields and along roads. Though they can thrive in tough conditions, they are also good in the garden as a companion plant to lettuces and other greens which require shade in the heat of summer.


Jewel: Snapdragon


Snapdragons come in a variety of vibrant colors and attract bees and hummingbirds with their fiery bright blooms. Just like Jewel they are fun and fairly carefree, but do enjoy some pampering!


The main barn....

Ernie: Wild Geranium


The wild geranium is a native plant in eastern North America. The tiny pale purple flowers grow well in full sun but can also be found in shade, creating forest carpets of color. The flowers attract native bees and make a lovely addition to any garden, peeking around the front of the other plants and adding their charm to the landscape.


Gus: Hoya


Hoyas are tropical flowers that love warmth and high humidity. Clusters of kaleidoscopic colored flowers in white, red, pink, and/or yellow hang from the vines and look like perfect little wax stars. The flowers are somewhat infamous among house plant owners for dripping sticky honeydew onto surfaces below.


Taz: Sunflower


Sunflowers are hard to miss. These sunny plants grow rapidly, attracting bees with the bright yellow petals in late summer and creating an enormous seed head which is food for autumn migrating birds. They require a good amount of nutrients from the soil to grow so large and have a handy trick to keep other hungry plants at bay- they secrete a toxic chemical from their roots which drives off all plants in their vicinity.


Maggie: Miniature Rose


The miniature rose is a petite beauty. It comes in several colors and is actually more hardy than the average tea rose. Miniature roses still require a fair amount of care to keep them at their best. Be careful picking the flowers though- the mini rose comes with mini thorns!


Harry: Daisy


Daisies grow freely in meadows and along roads and are a favorite of bouquet-gathering children. They are a very tolerant flower and can grow in a wide variety of conditions. The daisy has a very long flowering season and flowers can be found reliably from spring all the way through to autumn.


Miles: Trumpet Lily


The trumpet lily is a bold, striking addition to the garden. Its big bright petals form a trumpet shape that can be up to 6 inches long and comes in nearly every color, from white to deep orange. Trumpet lilies bloom in the middle of summer, when most other flowers have gone dormant. They plough right through the heat with relative ease.

*I did have Miles with Balloon Flower, but I think the Trumpet Lily is a more accurate match.


Aspen: Cherry Blossom


Cherry blossoms massed on the branches of a cherry tree are one of the most striking signs that spring has arrived. Blooms can be white or pink and are beautiful, yet delicate. The amount of blossoms that form depends highly on the weather conditions. They tend to fall apart on windy days.


Nadiya: Orchid


Outside of its native tropical environment orchids can take several years to bloom and will sometimes refuse to do so if moved to a different temperature, lighting, or soil. They dislike change. When an orchid does bloom though, the flowers are some of the most intricate, varied, and beautiful in the world.


And the pony field...

Abby: Foxglove


Foxglove forms tall stalks full of large, bell shaped flowers that are pink, purple, grey, or white and usually have spots or speckles. The unique shape of the flowers means they have whimsical alternative names such as "witch's mittens" and "fairy caps." The plant grows equally well in forests and in fields and is a favorite of hummingbirds. Extracted chemicals from foxglove have long been used in treating heart ailments.


Pudge: Hydrangea


The hydrangea is a flower that is made up of clusters of smaller flowers. In some varieties these clusters can be several inches wide, creating giant puffballs of blooms. Normally the blooms are white, but many gardeners turn the flowers different colors by adjusting the soil pH. These shrubs can't be fed too much nitrogen-rich fertilizer or they won't produce flowers.


Presley: Virginia Bluebells


Another native east coast plant, Virginia Bluebells flourish in shady woodlands where they flower in early spring and can create large patches of color. The flowers start out pink and then change color to blue. Bees and butterflies adore the little bell-shaped flowers. These plants dislike hot weather and go dormant after June, biding their time beneath the soil until the weather gets cooler.


Bodi: Dandelion 


Though considered an annoyance by some, a truly nurtured dandelion is a wonderful sight. It has adapted to a wide variety of conditions and grows through concrete, but it also finds a home in the garden where its bright cheerful flowers can grow to an inch in diameter. If left long enough it develops a delightful puffball of seeds that can then be blown on the wind to new places.


I hope you have enjoyed this fun adventure in matching ponies with plants. What flower do you think your favorite horse would match well with?

PS: Too many photos in this post. I was up waaay too late trying to find pictures to go along with all the descriptions. Bed time now.