Happy Halloween! Succulents can sometimes look like they're from another planet!
Succulents are slow growers. It can take years for one to even double in size. This can be an advantage if you want them to stay packed into a small space for a time, such as the ones displayed above! If succulents are put in a small pot they're also more likely to sprout "pups", or offshoots that can be split from the main plant and re-potted elsewhere. There are lots of reasons to plant small, including running out of space for plants in your apartment!
To begin I bought tiny, healthy looking succulents from the local nursery (and some extra cactus potting mix). I think I have two echeveria plants, a type of jade, and a crassula. J.D. told me he'd found a bunch of cute mini-pots over in one corner of the store. He was not wrong. I think this one looks like a tiny plant canoe!
Gathered my supplies... ready for planting!
I liked that the mini-pot had big giant drainage holes, because cacti and succulents require really good drainage. They like to be drenched thoroughly, then dried out fast! Otherwise they rot. So the pot was perfect for this type of plant. However, big giant drainage holes also mean dirt comes out the bottom with the water. So, I lined the bottom of the container with a layer of paper towel.
Paper towel: Check!
The first step was to dump out all of the surface gravel that was in the pot from the nursery. Rocks are good as a soil cover, but I didn't want them taking up what little space I had for soil!
The plants, sans container and rocks.
Next I split up the plants that were clustered together in one pot. It was cheaper to buy them that way, and they would do well for a year or so in that pot, but I wanted to plant them in this little container instead. I learned that apparently it is better to cut the roots apart instead of tearing them, because that way they have clean ends that are less likely to get infected by mold or bacteria. Makes sense. I did have to be careful of the rocks that were still embedded in the soil because I didn't want to dull my shears!
Plant mess.
Next I placed the plants into the container. Some of them had tall roots, so I cut one side of the roots to make a sort of "L" shape so I could smush them down into the pot. This isn't the best thing to do to a plant, but I did it. It seems to have gone ok. Succulents are pretty forgiving about root mangling. They grow from a single leaf if you treat them right, so they are capable of developing an entirely new root system from a stub technically. It's not the greatest way to start a plant but it's feasible.
As a matter of fact, I found this little stowaway hiding in the pot underneath of the echeveria!
Sneaky baby plant! Already had new roots and everything.
I put it in the tiny pot that the other echeveria came in, and it's growing nicely with a daily misting of water. I guess I got an extra for my money. Haha. It'll take years to reach the other plants' size though. Remember, they grow slowly!
Anyway, moving on... I then added some of the cactus potting soil around the plants to fill in the gaps. This took a little bit of finesse because of how little space there was between the plants. I used the blunt end of a wooden paintbrush to tamp down the soil close to the plants. It's good to pack the soil fairly tight in a small container like this to keep the plants positioned properly, but only if the soil is very dry. You probably shouldn't plant succulents in wet soil anyway but if you do don't pack it. The roots require air to avoid rot and to process food.
Adding dirt around the plants.
Finished soil packing. So pretty!
Finally, I added some "top dressing," aka: stuff to keep the soil from falling out of the pot every time I water the thing. I used fish gravel. They also sell soil dressings of all kinds at the nursery, from moss to fancy glass beads, but fish gravel works just as well and looked pretty. I pressed the rocks down lightly into the soil.
Top dressing. In the background you can see the top dressing from the original pot.
Ta-da! The most important thing to do after finishing a transplanting of succulents is to COMPLETELY IGNORE IT for a week. Don't water it, don't pull off any dying leaves, don't even look at it. (Ok, you can look at it. After all, that's why you got them!) But seriously, cacti and succulents need some down time after planting to heal their roots before watering them. Otherwise they can easily rot. So... after waiting a week I took this to the sink and dribbled water into the soil until it came out of the drainage holes, let it sit until it stopped dripping, and then put it back in its sunny spot on the table. These plants all like tons of sun, so I am trying to give them as much as possible. The echeveria on the end is still getting a bit leggy, but we'll see what it looks like after winter.
Yay, new plants! :)
That's it! Water every week to every other week, depending on how much soil is in there. These I water every week because they dry out so quickly. Hope you liked learning more about re-potting tiny, adorable succulents!
Cats have a reputation for doing exactly what they want and not being beholden to anyone else. This is usually where the blog post goes "but it's not true! You can get your cats to do tricks." No. No, cats have that reputation because that's exactly what cats are like. I'm not going to tell you that your cat is going to lie down and roll over for you every time you tell them to because they won't. They are horrible crowd pleasers. They are, however, excellent barterers. You throw in a little somethin' somethin' to sweeten the deal and they'll happily go out of their way to jump on a box for you. So... here is how to barter with your cat: Tricks for Treats.
The Goods:
Not endorsing Friskies or anything, it's just Ticky's preference.
The first step in training your cat is making them realize that there's food involved. You may have to search around for a treat that really gets your cat excited about life, but my cat isn't very picky. If it comes in a plastic pouch and rattles when you shake it he'll come running.
Most treats are pretty high in calories, so if you have big treats try breaking them up into pea-sized pieces to make the treats last longer when you're doing a training session. Try not to gorge your pet on treats. Keep it to 5-10 full-sized treats at a time. That's about as long as you want training to go on anyway. Shorter times are better for interest and memory.
The Deal:
Pick one trick at first to build on. You want it to be easy so your pet grasps the concept of doing an action to get a treat. Ticky's first trick was "Up." I'd hold a treat just out of his reach and say "up!" and he'd have to reach up with one paw to get it. As soon as his paw touched my hand I'd release the treat and say "Good boy!" At first he was kind of sloppy, just batting at my hand, or missing it by an inch or two. If he made an effort at it I'd still give him the treat. After he got the idea of reaching upward toward the treat I started touching my hand to his paw while it was in the air, then giving him the treat and the "good boy!" By showing him that touching my hand was the answer, I was able to then hold my hand still in the air and say "up!" and he would solidly touch it by himself after awhile.
The blurriest action shot ever of "up."
It's hard holding a camera and a treat at the same time!
The Tricks:
I've found it easiest to have both a verbal command and a hand signal for each trick. Ticky seems to respond more to the visual hand signal, but also having verbal commands can only doubly reinforce the trick, so I use those too. Doing the "omg, we're doing tricks for treats, isn't it exciting?!" voice also makes him more enthusiastic, so that's a plus.
Some tricks I've taught Ticky:
Sit: I started this one by holding a treat back over his head where he had to either back up or sit down to see it and said "sit". When he backed up I didn't do anything. When he sat down I released the treat. Eventually I did a hand signal of a fist over his head, then just a fist held at his eye level and he'd sit down for the treat.
Turn: This could also go under the "first trick" category, because it's initially just the cat following the treat around which they'll do anyway. Guide the cat into a turn by luring them with a treat. Eventually just make the motion of a circle over their heads with the treat. Be sure to say "turn!" It's usually easier going the first way you teach it than the other way. Try both! Give me Five: J.D. actually taught Ticky this one. After doing "sit" I open my hand right at his chest level and say "five" and he touches my hand with his paw. To train this one we basically annoyed him enough by shoving an open hand toward his chest that he'd lift his paw up to push it away and he'd get a treat for lifting his paw. Then, similar to "up" we started tapping his paw with our hand once it was raised. Now I only have to open my hand and he touches it for a treat. Seems like everyone wins. High five.
Jump: I picked surfaces that were too tall for Ticky to reach up onto without jumping onto it for starting this one. I'd make a show of arcing the treat from Ticky's level up to the couch or somewhere and say "jump!" When he jumped up to it he'd automatically get the treat because it was sitting there. Now I can make the arc movement and say "jump" and he jumps onto the surface I'm hovering my hand over. He never asks me how high though... Typical cat.
Touch: This one uses the cat's natural curiosity about new stuff that you hold out to them to smell. I started with a pencil or paintbrush that he hadn't seen before and said "touch!" When he sniffed the end of it I'd do the "good boy"/drop a treat for him. Eventually I moved the tip of the cool-looking stick to one side of me and said "touch!" and he'd seek it out to sniff it. Now he touches whatever I'm holding (or my fingertip) with his nose for "touch." This is apparently a great one for if you want your cat to be in a movie because you can be across the room from them, at the top of steps, etc, hold out a stick and say "touch" and they'll run over to it. Ticky will not proooobably not be in any movies, but it's cool nonetheless.
Go In: This one evolved from a need to get Ticky into a carrier without fuss when it's time to go to the vet. I'd show him that I had a treat, then snap and point into the carrier, saying "go on in!", then toss a treat into the carrier. He'd follow it in and get the treat. Eventually I could snap and point and he'd go in by himself, then turn around to get the treat I put in for him.
Over/Under: This one is really just a modification of both "jump" and "go in." I stick my leg out (because I'm too lazy to make him a hurdle) and do the "jump" hand motion over it and he jumps over. I do the snap and point for "go in" toward the space underneath of my leg and he goes under. It took a few tries to get the hang of it. It helped if I just threw the treat underneath of my leg at first for under. You can see in the following video that he's still trying to follow the treat instead of completing the trick sometimes. We're working on it!
Here's a video of Ticky doing some of his Tricks for Treats! You can see he's enjoying this bartering. Hehe.
It's pretty amazing to watch your cat figure out a new trick. They have little mental breakthroughs and suddenly realize what you're trying to tell them you want and it's awesome. I can only imagine it's the same feeling Ticky got when he realized he could get me to move off the couch by scratching the carpet. *sigh*
When I was eight years old I begged my parents for a cactus. I think I had been flipping through some of my mom's gardening books and ran across the succulents section and found things like this:
Lithops, or as I like to call it the tiny butts plant.
Weird fuzzy cacti, similar to one my sister once grabbed as a toddler.
It was not so fuzzy below the surface. More spiny. :(
I thought to myself "this is the weirdest type of plant I've ever seen in my life, I have to have one." My parents said it was the easiest birthday purchase they'd ever made. They bought a $5 miniature cactus set from Walmart and I was beside myself with happiness. Not just one cactus, but FOUR to raise all on my own.
There were actually two cacti and two aloe in the pack. They were the following types:
Ruby Ball Cactus which I named Eenie
(Actually it turns out that this one is two cacti grafted together!)
Aloe Juvenna, which I named Meanie
Haworthia, which I named Miney
Pilosocereus Azureus, which I named Moe
Eenie and Meanie made it a few years. Eenie's red cap eventually rotted from overwatering. Our cat knocked Meanie off of the desk a few too many times. However, Miney and Moe are still alive and kicking, making them the oldest cacti I own. They are both approaching the two decade mark!
The succulents initially came in teeny tiny pots with labels that said "these will grow to 3 inches tall." I guess they only meant if you kept them in that exact pot, because Moe is now a good foot and a half tall...
Moe doesn't know the meaning of chill.
Eventually Moe will fall over or break, but with a bit of luck I'll be able to save the top half for re-planting. Hopefully that doesn't happen for another several years though. I don't want to go through the trauma of trying to save a 20+ year old cactus until I have to. :-/
Miney gave me a good scare a few years ago when I moved into my current apartment. I put it in a sunny window and left it, as I had always done in my parents' house. However, it turned brown in a few months! I was sure I'd lost a succulent, but I moved it to the kitchen table in less bright sunlight and kept close tabs on the soil moisture. Now a few years later Miney is doing very well! It lost a good bit of growth, and used to be much bigger than it is currently, but now I technically have two Mineys- there was a "pup" or side growth off of it that is in the same pot but has developed as a separate plant.
Miney today
It turns out that taking care of succulents mostly involves NOT giving them much in the way of food or water. A "neglected" cactus is a happy cactus. You do have to check on them to make sure that they're not sitting in moist soil for more than a day or two and that the leaves look green and full, but other than that I've gone a month at a time without watering my indoor succulents. I actually lose more to overwatering than underwatering. They tend to mold or turn to brown mush if watered too frequently.
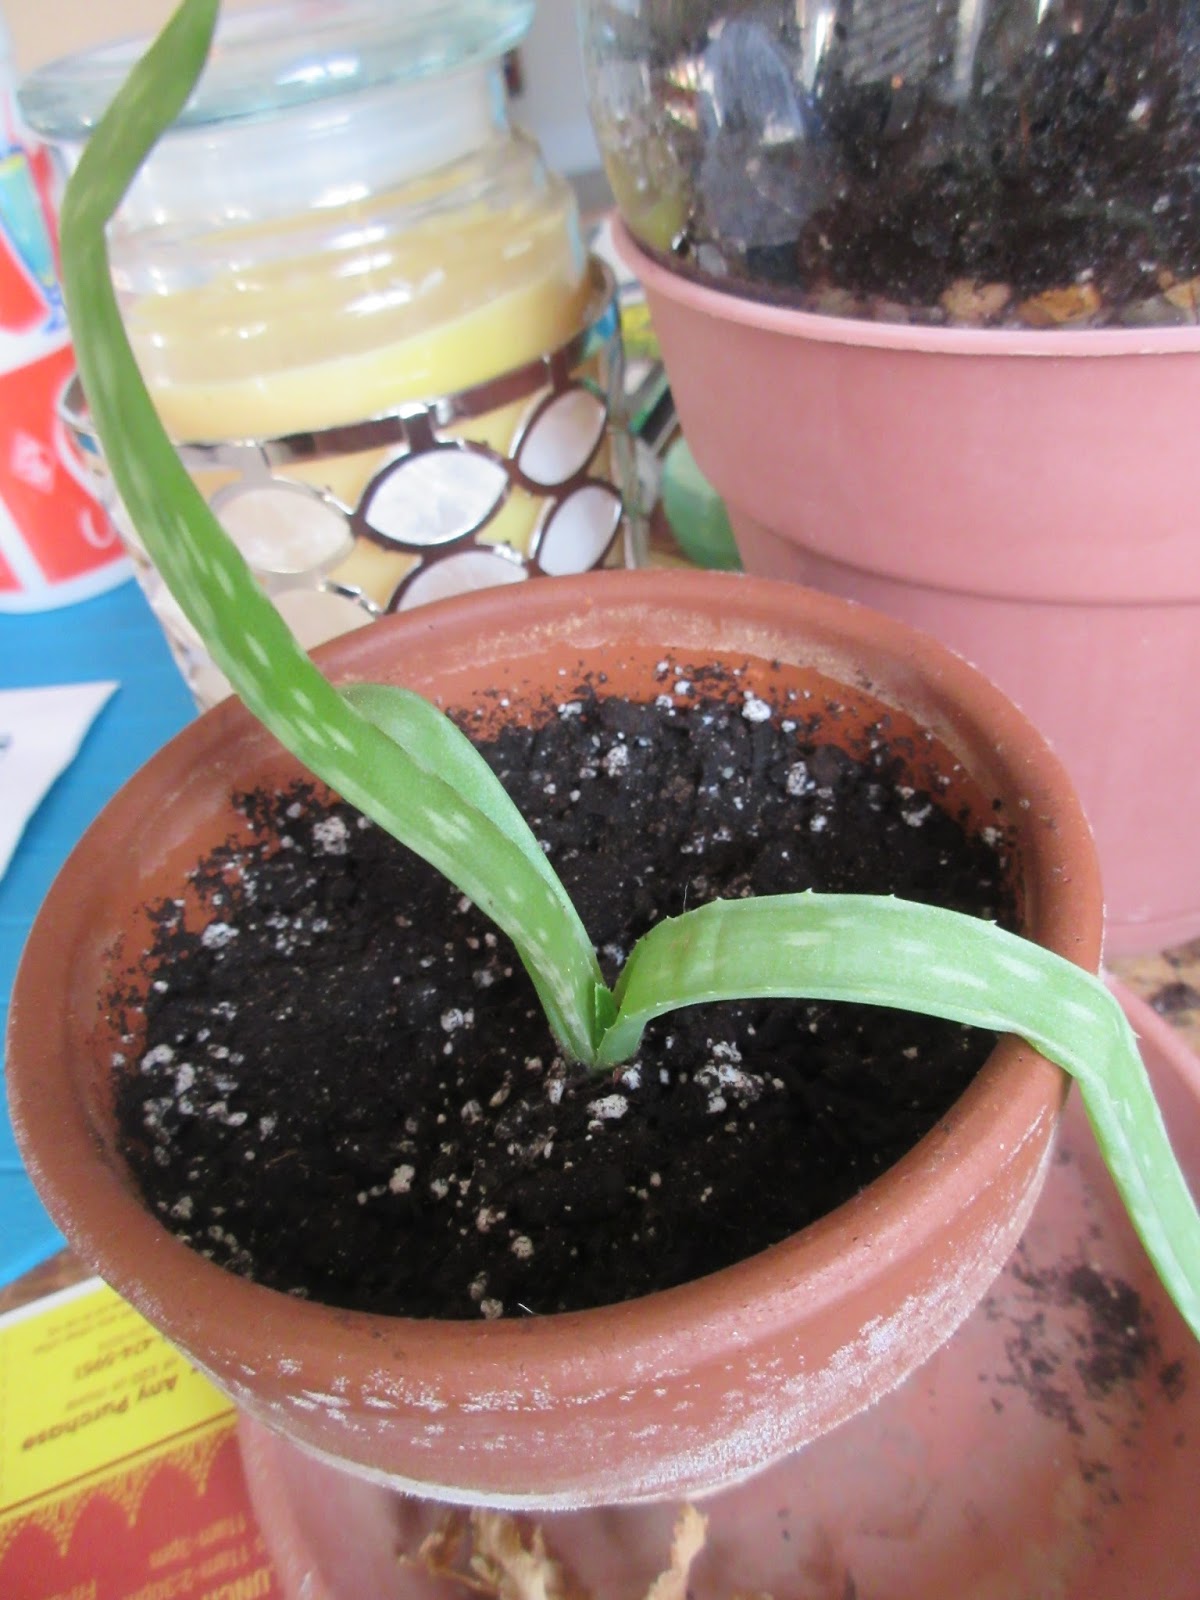
I now name very few of my plants in case of sudden plant death, but I do have some more succulents that I've grown fairly fond of. One is another aloe, though I'm not sure of the type. It was a gift from my grandad to my mom in a pot with several other succulents, most of which are still at my parents' house. I liked this particular one so my mom said I could have it. It's been with me for about 10 years now. I recently got a pup off of it, which has been developing nicely.
Pup from the aloe which has grown a new leaf bud in the past three months. It liiives!
Aloes are slow growers, especially in pots. None of my aloes are very big except for....
Ursula 1 and Ursula 2, the Aloe Vera
A gift from a friend before they moved, Ursula the Aloe Vera plant has survived dividing twice now. The smallest Ursula is currently putting out a new leaf to make up for the ones that have faded in trying to grow proper roots. In the picture you can see a tiny leaf bud growing in the center of the plant. It also liiiives!
I wonder how big this one will get?
Some succulents do very well at growing fast. My portulaca plants have not only taken over their pots but have produced tons of offspring that I'm putting into different pots. The Rose Portulaca has been doing amazingly well this year in the heat and will probably be a repeat purchase next year. I'll try bringing one of the Rose Portulacas inside for the winter, but chances are it won't do very well considering it's been outside its whole life and is an annual plant.
Rose Portulaca, happily taking over the world.
There are lots of other succulent plants that I would like to try growing. I particularly like the look of things like string-of-pearls and various types of sedum. Maybe someday I will have an entire rock garden for my succulent plants. Wish me luck!
When I first arrived at the Big Purple Barn I immediately glommed onto Aspen as the horse I wanted to hang out with the most and try to become friends with. I'm not totally sure why it was Aspen. Maybe because he's a beautiful grey thoroughbred, maybe because he was shy and unsure of things and I identified with that, having just started learning about horses. In any case, he's the horse I like brushing for long periods of time and taking for walks.
Aspen enjoying one of his favorite activities: Eating.
Recently his neighbor in the next stall over, Nadiya, had some friends leave who had her as their favorite Big Purple Barn horse. (We all love all of the horses equally, but also tend to play favorites. Shhhh.) They moved recently and for a little while she didn't want anyone to brush her or interact with her, but she's gotten less aloof recently and I decided to start taking her for walks as well, alternating with Aspen. This is partially because I would like to practice things like going around cones and backing up and moving forward and Aspen can't do those ground exercises because of tendon troubles. So, I will do all of the me-training with Nadiya and save my laid-back just chillin' with a horse walks for Aspen. I think it's sort of funny that I'm slowly working my way up through the herd hierarchy in terms of my comfort with walking them. Haha.
Nadiya and her friend Wyatt who recently moved.
Let me tell you, Nadiya steers like a dream. She tends to be hyper-aware of the humans she's around, which is bad if you are nervous or unsure (hence why she wouldn't have been a good horse to start out walking), but SUPER cool if you're trying to direct her movement because she picks up on it immediately. I don't know if that's training or personality or a combination of the two, but it's neat.
Barbara let me do some round pen work with her the other day, having Nadiya trot around one direction, then turn her and trot in another direction, all without a lead line. I've only done it two times before (neither with Nadiya), but it went really well! Nadiya even followed me around the round pen for a lap afterwards without any lead rope or anything! I still don't quite understand how that works but it is really neat to experience. The next day she was also a lot calmer with me and actually let me scratch her around the ears and chin for a good five minutes. Like, leaning into the scratch enjoying it. Before she'd tolerate it for a second or two and then move off. I made sure to give Aspen some ear scratches too just to make sure he didn't feel left out! Then I also ended up giving Chuck ear scratches because he looked like he needed some too. Lol. I am an ear-scratching expert.
Chuck has always been up for ear scritches. Or peppermints if you have them.
It turns out that walking horses and riding horses, from the few rides I've experienced, is a lot like swing dancing. (Maybe swing dancing will be another post! I haven't gone in forever, but really do need to get back to Glen Echo and swing dance again...) Each partner you dance with has the same approximate cues for swing moves, but each is different enough to require an adjustment period while you learn how to follow the new changes. Some have tiny cues that you have to weed out from the general background noise of movement, some have cues so clear that you find yourself following the dance steps almost without knowing the exact move. Some don't really know what they're doing yet so the cues and moves are muddled and you get confused, and some have been dancing forever so even if you make a mistake they make you look good. Everyone has a few swing dance partners that they really click with and dance well with but everyone benefits from the variety of dance partners there, as you only learn how to swing dance well by practice and diversity. No matter what you have to pay attention to your dance partner and what they're doing, otherwise you get stepped on! haha. Luckily there are plenty of dance, er, walking partners to practice with at the barn.
I'm not sure if it was a good thing or a bad thing when I realized it was possible to grow plants from pieces of other plants. On the plus side I can make more plants for free. On the downside every time I prune a plant I have an internal debate about whether I should throw the cuttings away or not. You know those horrible pet owners who just let their animals propagate freely until they have like a hundred of them because they don't want to get them neutered?
Yeah. Yeah, I'm that person but with plants.
If I run out of dirt and starter pots maybe I'll stop. Maybe.
Not every plant is a good prospect for cloning. I tried propagating the African Daisy before it died, and unfortunately it just didn't take. However, it's nearly impossible to NOT propagate a Pothos plant. I think you could probably just throw a stem on the ground and it'd somehow take root. Some plants naturally seem more able to form roots off of a cut stem than others.
To determine whether a plant could potentially be cloned I look for the following things:
Segmented stems: Segments mean that a stem comes in sections. These sections can usually sprout either leaves or roots depending on whether the segment is above or below the soil.
Angel Wing begonia with segmented stems
Wandering Jew plant, with a new leaf bud growing from a stem segment
Root buds along the stem: These usually pop up when the plant is getting low on resources. If it's in a pot it may be getting root-bound or it could be running low on nutrients. It's common on runner vines like the Pothos, but other plants like tomatoes or this basil plant can also grow roots along the stem. I haven't tried re-rooting basil or tomato, but I've read that it's possible with root growing hormone. (A powder or liquid you can find in garden centers. It's an acid though, so apparently it should be treated like any household chemical. Wear gloves.) Putting a stem with a root node in the soil will result in the root node growing into a full root.
Basil plant with root buds on stem
Pothos plant with root bud
Pups or suckers: Plants such as aloes, hen-and-chick plants, spider plants, and iris grow tiny versions of themselves when they get big enough. These mini-me's can then be separated from the main plant and planted to form an entirely new plant! I've done this with several aloes and with spider plants but have only observed others doing it with other plants. Succulents (plants that grow well in dry conditions) work because their leaves store energy well, allowing time for the roots to grow. It appears to also work with plants that have rhizomes- energy storing roots which sprout tiny plant pups along the length of the root.
Baby aloe that came off of a big aloe!
Sometimes plants surprise me with their cloning abilities. I should probably have guessed that Portulaca plants would clone well because they are a type of succulent. However, I was very surprised to find out that not only does it root well from a cutting, it will actually flower while still forming roots!
Literally planted this yesterday, not blooming.
This plant is crazy.
If you didn't know already, I'm a little obsessed with the character Holtzmann from the new Ghostbusters movie. Not only is she a super cool nuclear engineer, she also has killer awesome fashion sense, a kooky personality, and specializes in spectral containment. What's not to like?!
So obviously I need to be Holtzmann for Halloween. Here's what I've got planned so far:
Exhibit A: A pair of Holtzmann-approved eyewear.
Ironically enough, probably not OSHA approved,
so don't do real science in them.
Da goggles: I actually have the pair from the final ghost battle on the way and am TRYIIIIING to figure out how to get my grubby little hands on a pair that look like her Spectres, the ones she wears for a majority of the movie. However, even if plan A falls through I have this pair of pretty sweet goggles to fall back on. They weren't expensive either! The pair pictured was like $10 total, shipping included. I'm cheap which is part of the problem with finding the Spectre-like goggles. The movie goggles are modeled off of old 50's and 60's safety goggles and finding JUST the right pair (not even counting yellow lenses) for a price that doesn't make me feel like a bad person is tough. I'll keep searching...
Exhibit B: Standard Holtzmann attire,
including long vest, high waisted pants and snazzy boots.
Da outfit: I think muted colors of loose clothing and/or vests is the answer here. I have a green jacket that might work for the outer layer and I can wear my barn boots, but everything else is going to require some Goodwill shopping. I'm undecided as to which outfit I'll go for because I'm not sure if all of them will go well with my height. Kate McKinnon is tiny! I am like if Holtzmann and Patty swapped heights. Still, I should be able to find and use rough approximations of her style. The other option is to get a flight suit and put reflective tape on it for a classic "Ghostbusters" look but again- I'm cheap. Well, cheap but trying to make the outfit look not-cheap. Sometimes the suits in the costume shops are paper thin cotton and you can tell.
Exhibit C: The "Screw U" necklace
Honestly I didn't get the reference until I started searching "Holtzmann Necklace" online.
Da Jewelry: Holtzmann has a "Screw U" necklace that she wears pretty much all the time and it'll add to the costume if I can make one. I'm thinking its about shower ring size and I have plenty of screws left over from making the Catlas 5 tower, so if I cut out and spray paint a U and put a chain on it I think it's a done deal. Another option is the weird cow skull necklace she wears in one scene but it's less iconic. It is, however, available on Amazon. ;) I'm also kinda digging the swipe-button that's linked to her proton pack weapons but unless I get an Iphone sometime soon that will be hard to replicate. I'm sure SOME crazed fan has already made an app that duplicates the effect.
Da Makeup: Kate McKinnon does wear a significant amount of stage makeup to become Holtzmann. I'm not sure I'm going to go with complete shadowing and highlighting and all that because I don't use it often enough to do the make up well. However, I think I should at least do eyeliner to help bring out my eyes behind yellow lenses and try out whatever color lipstick she has! Thankfully I have about the same skin tone that she does so it'll look really similar if I can only find what color she's using. Baaah.
Holtz Hair
Da Hair: This is the scariest part! :O I am pretty sure I can pull the hairstyle off. Judging from all of the different camera angles and different days of shooting, Holtzmann's hair is a little shorter than chin length for the top layer and gets longer further down so she can put it back into a tiny bun from the sides. Dyeing in the highlights will be more scary than the cut itself as I've never gotten my hair dyed before (Well, except for some bright red tips a few days before I got my hair trimmed in college.) I'm definitely getting it professionally done though. That'll be the expensive part of my costume just because it won't be a costume, it'll last a decent amount of months afterwards too.
Da Equipment: Sadly I don't have time to make a full-up proton pack before Halloween. Maybe if I really stressed about it but I've been there and it's no fun stressing about a costume. However! I can definitely do the ghost trap. I'm planning on retrofitting our vacuum's dirt "bag" (aka: hardshell plastic container) because it looks pretty close shape-wise. It just needs some sheet metal-looking exterior work done to it and I miiiiiight end up putting some glowing LED's in it. We'll see how far it goes. If I have extra time I'll also add movement with the stomp-pedal attachment. That'll make it really fun. Then I can run around work yelling "we put a ghost in a box!" It'll be great.
PS: I also learned about this SWEEEEET easter egg found in the opening scene of the movie: a link to the website containing cool schematics for all of the ghost-busting equipment.
Well, that's the extent of my costume idea. I hope it turns out really well! :D I'm super excited about it and can't wait to dress up for Halloween. Only two and a half months left!!!
Pruning has to be one of the weirdest things we do for plants. It makes sense that a plant needs food, water, sunlight, and an appropriate temperature to be happy and healthy, but cutting a plant's extremities off in order to make it healthier?! That seems like madness!
The tomato plants were being smashed up under the porch railing containers, so they got pruned!
The truth is, plants (especially plants grown in pots) need pruning in order to stay healthy. It keeps them from turning "leggy," where the bottom foliage dies off and only the tips are left. It makes them squat and compact to keep the wind and rain from breaking the stems off haphazardly or knocking the pot over. Pruning flowers off after they've passed peak bloom can help a plant conserve energy if you don't want it growing too many seeds. It can also be used to save a plant that has diseased or insect-infested leaves and force the plant to grow new, healthy leaves instead!
Before trimming mint: Leggy and bare.
A week or so after trimming mint: New growth!
To prune plants you can either use your fingers or preferably some sort of shears or scissors. The sharper the cutting tool the better the plant will heal over, especially if it's a particularly large stem. Stems can get infected from bacteria or fungus in the environment, so a clean cut is going to produce the least amount of surface area for gross stuff to get into the nooks and crannies. To keep diseases from spreading, dip your shears in isopropyl (rubbing alcohol) after cutting from a plant that's been infected with something. (Generally the advice is to dip it between cuttings from EVERY plant, but I'm lazy and unless I spent a crap-ton of money on a plant or am really in love with it I'll take the risk of sharing shears between healthy plants.)
Shears for trimming tiny stems. For larger stems I use kitchen shears.
When making a cut, try your best to always trim from the top of the plant, getting rid of the newest leaves first. The exception in this case is if the leaves lower down are infected or dead already, in which case you can cut off those individual leaves further down. Cut the stem between two leaf layers, just above the leaf level where you want new leaves to grow. This will encourage the leaf layer below to bush out and make more foliage. Sometimes you'll get new leaves all the way down the stem once you cut the top leaves off. There's more sunlight getting to the stem area below, and the plant also sends out signals: "Grow more leaves! We're being eaten!" Leaving a bit of stem above the leaf layer you want will allow you some room to cut it back further if the stem gets infected. If you have an infected stem it'll start getting mushy and brown, spreading down the stem. Cut it below where it's mushy and dab some isopropyl on the cut. It'll help it dry out faster and kill the nasty germs!
Pruning the catnip between leaf layers
For a diseased or leggy plant it depends on the type of plant how much you can trim off. If you know from prior trimmings that the plant rapidly bounces back from trimming (like my Columbine and mint plants), go ahead and trim off as much as you need to. For plants that you're unsure about the general rule is to only cut off a max of 1/3 of the leaves at a time. Let the plant start new growth before cutting off more leaves.
Diseased leaves all over the Columbine plant, pre-trim (I trimmed these back to the ground)
Columbine plant post-trim, about a month later. New leaves don't have any mildew, leaf miners, or mites!
For flower blooms, it's best to "deadhead" the flowers before they start forming seeds. That way the plant conserves energy and flowers more. Seed-making is hard work! It's also good to take the flowers off of plants even if they're the "non-seeding" hybrid varieties because a) it looks prettier not to have dead flowers all over the plant and b) dead flowers can rot and lay on the leaves, causing molds, fungi, and gnats to colonize the plant. To deadhead a flower, pinch or cut the stem just below where the flower was.
Deadheading the begonia flowers after the bloom has wilted.
I hope this has been useful! It's hard at first to know when and how much to prune, but try looking online for pruning advice for the plant you have. The internet has helped my plants a lot, especially looking up plant diseases and tips for getting rid of them! Everything else I'm learning the hard way. Haha.