 |
| You cannot contain me! Or maybe you can... |
Most of the time your cat is a free-range, crazy beast but on occasion you may have to trim his claws, apply flea meds, or (God forbid) constrain him if he's badly injured. In those cases it's best not to have to contend with a frustrated, frightened, or potentially angry cat. Containment is an essential tool to have in your cat-care repertoire.
So, how do you constrain a cat? It depends on the temperament of the animal and how comfortable you are with them, as well as how severe the situation is. If you're like me and you were blessed with a very tolerant cat, you might be able to get away with just the Method 1 containment. If your animal is feral or you're unfamiliar with the cat you're trying to contain then you may have to use Methods 3 or 4 to avoid hurting yourself or the cat. Here are the methods that I am familiar with for cat containment:
Method 1: Cat wrestling
If cats knew JuJitsu it would be a terrifying world indeed. Luckily, when faced with things they don't like, the tame cat generally has two escape moves: Spring forward or back up. In order to effectively wrangle your kitty you'll need to block both of those exits while making sure they are comfortable enough not to try their next escape move: biting at your hands. For me this is a multi-step process. Make sure you are calm and confident throughout the exercise. Try it a few times without actually needing to constrain your cat until you can get the hang of it. Don't try to reassure your cat with high pitched or concerned sounds, as weirdly this has the opposite effect on them and they get worried about what you might be concerned about. Just talk to them like you would normally.
Step 1: Lure and distract
 |
| Ticky says "Sure, I accept your exchange of treats for claw trimming" |
My cat will do pretty much anything for treats, so the first step is luring him over with them. I like to have the pair of cat clippers, his toothbrush (yeah he has a toothbrush), or whatever I'm about to do with him on the floor so he knows what's coming. If he's so wound up that he sees the clippers and runs then I know I should probably try again in half an hour or so when he's less of a spaz. I sit on the floor in the position shown in prep for cat-wrestling. I sit with my legs tucked under me and spaced slightly apart. I have a pile of broken-up treats to the side of me to distract him with if he gets antsy while I'm trimming his claws.
Step 2: Grab and tuck
 |
| I pull Ticky towards me and tuck his tail out of the way |
Without making sudden movements, but just moving with certainty and intent, I grab my cat under the armpits and move him toward me. Once he's closer to my body I tuck his tail in close to his side with my left hand (or right hand if you're left handed). This keeps his tail from being bent wrong or being trapped under my leg when I sit back down. I position his rear end toward me, his front end away from me and sit down. This blocks his rear exit- he can't back up. (If you don't sit down you'll quickly find your hands empty and a somewhat frowzy looking cat behind you!)
Step 3: Blocking the front exit
 |
| My hand is on his chest, blocking him from moving forward. He can still eat treats off the floor. |
To keep Ticky from jumping forward out of my hold I put my left hand (or right hand if you're left handed) on his chest, up close to his neck. It is helpful at this point if you have some treats next to you to toss some in front of the cat so they're distracted while you pick up your clippers. If the cat is very wiggly you may have to put one hand on the cat's chest and one hand on their shoulders and gently but firmly hold their torso in place while someone else trims their claws. This hold is also useful because it is very hard for the cat to reach around and bite you while your hands are that close to their head. If things get too crazy you can simply let go and the cat will spring forward and away.
Step 4: Working on the cat
 |
| It's hard to see, but my left hand has reached under his chin and around to pick up his right paw. My left arm is still blocking his chest. When trimming the other paw it is the opposite. |
Now you are ready to begin doing whatever task you needed constraint for. I usually bend over to get closer to the cat's paws if I'm trimming their claws like this. This also constrains them more from the top. I do a few claws, then reward Ticky from the pile of treats beside me. Then continue clipping, reward, etc. I've used this constraint technique for claw trimming, eye and ear cleaning/inspection, tooth brushing, flea med dropping, and removing tape or other sticky things from his fur. I have not yet used it on Ticky to treat an injury though our family cat, Max, used to be held down like this for putting medication on abscesses he used to get from cat fights.
Method 2: The Towel
Towels are used for more feisty cats but the technique is roughly the same as the first method, just with additional layers between you and claws. It is also harder for the cat to move around when constrained by a towel, making it an even better method for holding a cat still during medicating or wound inspection.
Step 1: Lure and distract

If you can, lure the cat close to you with food. It is far easier to wrangle a cat that is distracted and within reaching distance. Though it is possible to toss a towel over a cornered cat, it is much harder, not to mention more stressful for you and the cat!
Step 2: Towel approach

Approach the cat with the towel from the side/back as shown. Keep your movements calm but swift, firm, and purposeful. Don't try to suddenly "attack" the cat with the towel. Instead, move the towel in and surround the cat with it in one smooth movement. Hopefully they're still eating treats!
Step 3: Pick up the cat burrito

Pick up the cat in the same way as you did for Method 1. The towel should further wrap around the bottom of the cat as you drag the cat toward you. You should still be grabbing them just under the armpits and still be in the same sitting position that you were in Method 1. There's just less of a chance of flying claws.
Step 4: Wrap the cat
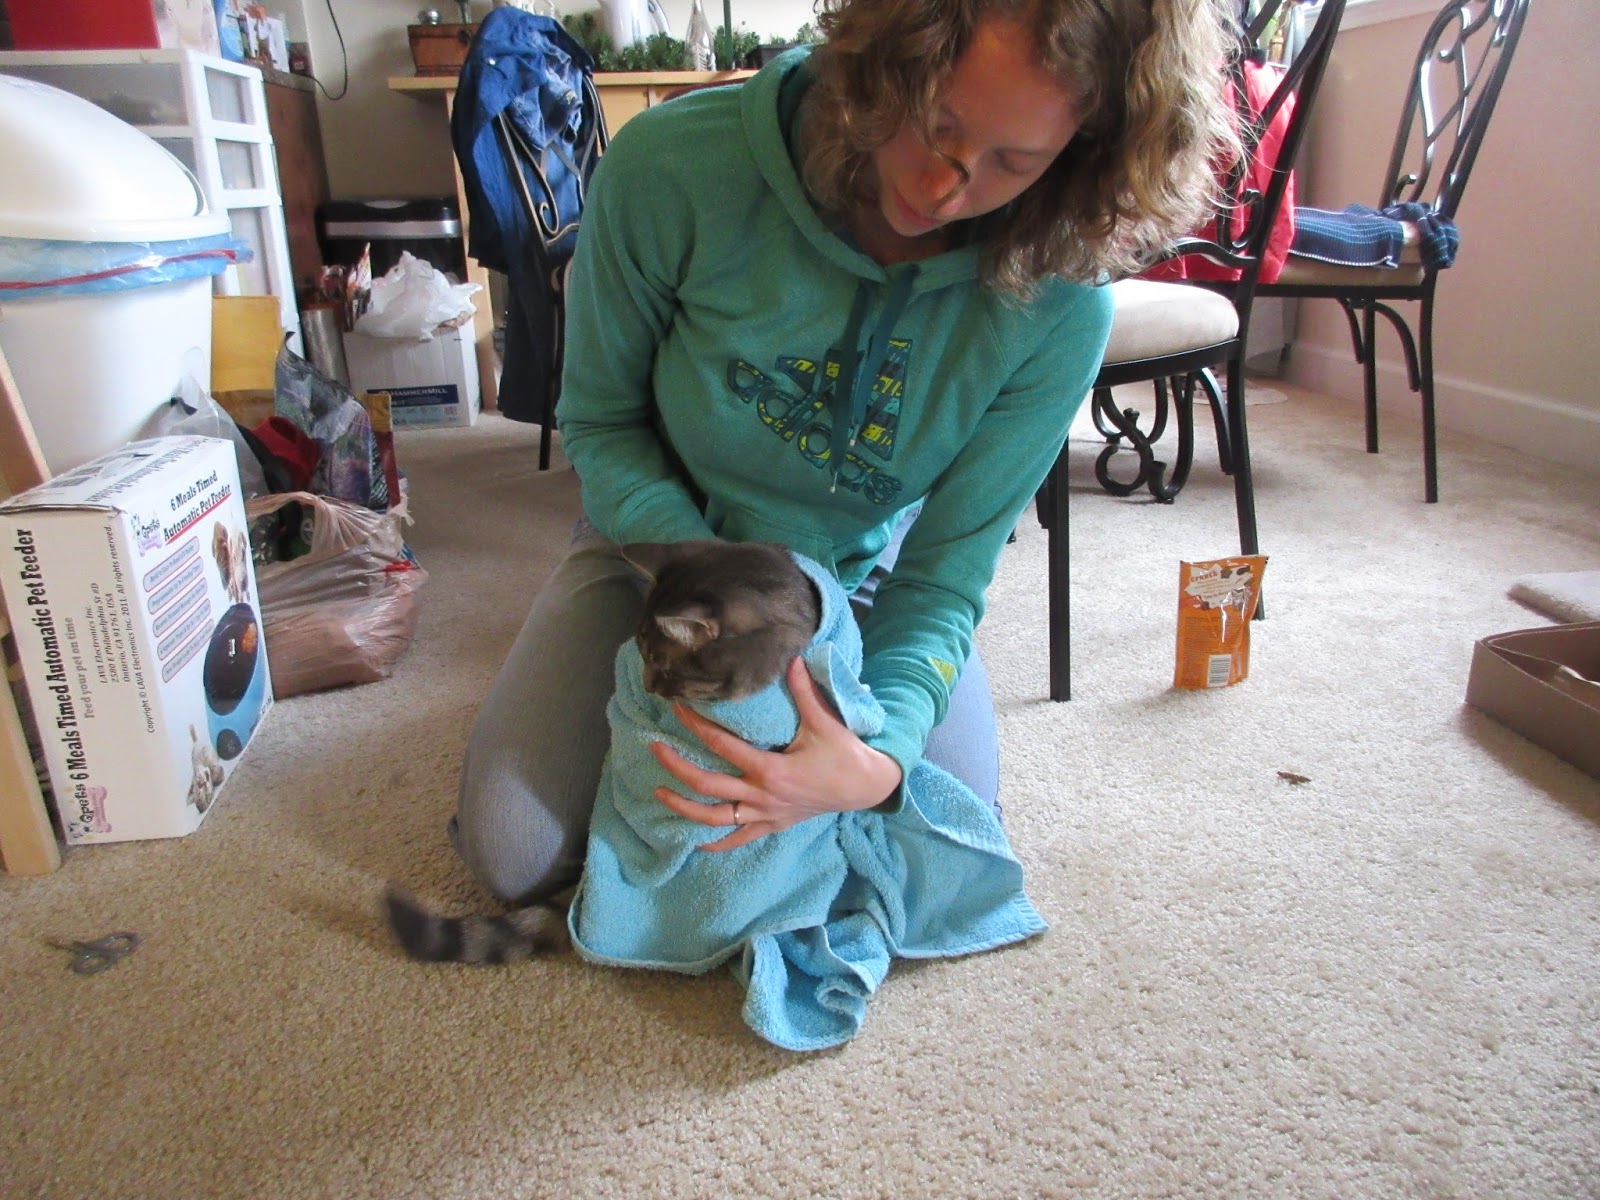
Once the cat is facing away from you with their rear end constrained on either side by your legs, fold the towel around the front of the cat and hold it in place at the chest, just under the cat's chin. You now do not need to worry about holding the cat's shoulders down, as the towel can do that job with you just holding it firmly in one hand on the chest. This prevents the front escape, your body prevents the backwards escape. Inspect away! You can also use this method to get an unwilling cat into a carrier, or to hold an injured cat's limbs still, depending on how tightly you wrap the cat.
As with the previous method it's best to practice this a few times first on a friendly cat in a relaxed mood where you don't actually need to do anything with the cat. Ticky gets treats for being such a good wrapping demonstration volunteer. He says "no problem!"

Method 3: Cat in a Sack
I would probably not use this one unless I was absolutely unable to confine the cat using the prior two methods or if the cat's wound was on the back end where it is hard to get to with towel wrapping. If the cat is prone to biting or is semi-feral and wary about handling this is also a way to capture and inspect the cat. Its head is enclosed and the pillowcase can be opened around a single paw, for example, to get a closer look at it. Note that the cat can still breathe through the pillowcase (unless the pillowcase gets wet! Be careful about pillowcases that get wet- they can create suffocating conditions), and can see shadows of movement but not the environment around them. However, be warned that unless you have the pillowcase wrapped very tightly around the cat they can still move around and bite through the fabric. If you have a very vicious or feral cat, best to trap them in a humane trap and transport them to a vet to inspect!
Step 1: Distract and prepare

Bunch up the pillowcase behind the opening so it is smaller and easier to work with. Distract the cat with food and hover the pillowcase near their head to see if they are immediately frightened away. If that is the case then there is very little chance of actually getting it over the cat- pick a carrier or humane trap instead.
Step 2: Capture

Step 3: Block and tumble

When the cat backs up, tuck the pillowcase under their rear and grasp the far edge, pulling it toward you. This will flip the cat over onto its back. Do not do this in the air! Keep the pillowcase on the ground while flipping the cat to avoid injuries. Also do not open up the pillowcase. Keep it closed at the top to prevent the cat from escaping. You now have a very irritated cat in a bag, but it is a constrained cat, and one that is probably not biting or clawing your face off. You can now transport them safely to a cat carrier or wrap the cat more tightly to constrain them for inspection.
Not a step, but I wanted to reassure Ticky that me dumping him in a pillowcase was an alright thing to do. lol. He got lots of treats afterwards and only had to lick himself off indignantly for a few minutes.
 |
| "Well, this is new." |
 |
| "I hope I get treats for this." |
Method 4: Carrier or Humane Trap
If you're taking your cat somewhere and need them confined for the entire time, or if you're dealing with a feral cat then the best place for them is in a carrier. They are safe, no matter how wild they get, and you are protected as well. You can pick them up and take them wherever you need to and they have enough room to move around during a longer trip. If your cat is feral and doesn't allow you near them then a humane trap is basically a carrier that automatically closes behind the cat. ALWAYS remember to check a humane trap every hour or two. Do NOT leave a cat out in the elements while trapped. They can quickly dehydrate or overheat/freeze and die.
Step 1: Lure early and often
 |
| Treats make a carrier into a toy that only SOMEtimes takes him to the vet |
The easiest way to get your cat into a carrier is to get them in it when you're not about to drag them to the vet. Leave your carrier out and use it regularly as a training tool. Toss treats into it at least once a week and get them used to going in and out of it, and get their scent into the carrier. This will make it insanely easier in an emergency. I had to get my cat quickly out of the building when a fire alarm went off in our apartment complex, and I just shoved him in there and closed the door. Easy peasy. When he started freaking out he was already contained.
Step 2: Contained!
 |
| Ticky is safe and portable in his cat carrier! |
I hope this has been a useful tutorial on the different methods to contain a cat. I'd like to give a big thanks to Ticky for being such a good sport and J.D. for being the cameraman during my cat-containing antics. Ticky is sleeping on me as I write this, so he doesn't seem to hold a grudge. :)
No comments:
Post a Comment